Original by
Find an easy step-by-step tutorial to transfer images using wax paper! This wax paper transfer tutorial is great for saving some money on costly transfer paper!

I have been playing around with a lot of mediums lately, one being iron on transfers. I had bought some the other day, but they are pretty expensive if you only make one item per sheet. So I thought I would try an alternative. The only thing I had around was wax paper, so I gave it a try and it worked GREAT! See how I transfer images using wax paper:

Here are a few things I took away from trial and error.
Supplies:
- Wax Paper (you can also use label paper
or freezer paper
)
- An ink jet printer
- A credit card
- And an object you want to transfer to. I chose to use a wooden pizza peel.

TIP: I found that if you wet the wood a little, it would make the transfer darker. Just make sure it’s not too wet, then the ink will run (a happy balance).
DIRECTIONS:
Cut the wax paper to the size of printer paper.

I used a graphic from The Graphics Fairy…she has the BEST blog!! Check it out for some really great stuff!
You will need to reverse the image. Most computers have the program Paint. If you aren’t sure just do a search for it in your start bar. Open the picture you want to flip, then go to Image in the top bar. There is a drop-down option for Flip/Rotate. That should reverse the image for you.
Put the wax paper in the printer and make sure it’s under the rollers, but not too far in. If you put it on top of printer paper, you can use the paper as a guide on how far the wax paper needs to be in the printer.
Stand close to the printer and help guide the wax paper out. OH, and make sure there are no wrinkles!! It can cause the wax paper to get jammed.

You will have to work quickly, but once you set the wax paper down you CAN NOT move it.
Try to line up the paper then gently lay it on the surface you want to transfer it to. Holding the wax paper firmly down, use a credit card to gently scrape the surface.
 Then carefully remove the paper. It will still have ink, so be careful not to drag it.
Here are the two sides of the board, the first one is without getting the board wet and the second one is damp. You can see that the second is much darker but the paper moves easily so it smeared a little. It all depends on the look you want.


This project takes about 10 minutes and is super cheap. I think I will be using this A LOT. It works on fabric too, but the thread has to be really tight for the best results.
For the VIDEO TUTORIAL of this project, check out the video:
There are two ways I have found that work the
best to seal printer ink from a wax paper transfer or freezer paper transfer. (This is only a wood and
metal sealant tutorial!)
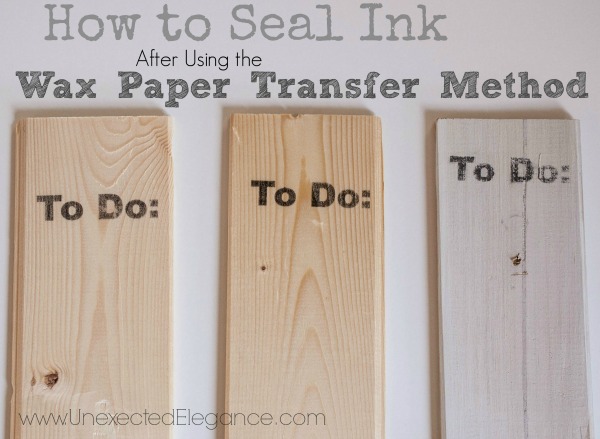
1. Spray on sealer. This method is my favorite and causes the least amount of ink
bleeding. My suggestion is to use a few light coats. Also don’t
spray too close to the transfer. The lighter the mist, the less chance
you will get of the ink running.
I did a test of bare wood and painted wood. You can see the results in the image below. The painted piece of wood had a little bit of a bow and the transfer didn’t take as well, but the sealant did not affect the image.
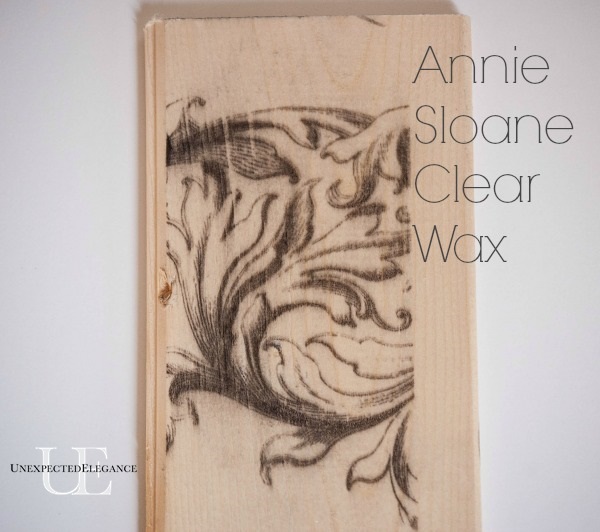
2. Clear Wax. This technique can cause the ink to bleed slightly. A lot of people
who use this transfer technique are using it over Chalk Paint, so I wanted to
let you know it’s an option. (You can also use a wax over latex paint
too.) You can see in the picture below that it made the image slightly blurry.
I don’t have any pictures of using a liquid sealer, but it WILL make the
image run more than the first two methods. My suggestion is always to
test the sealant on a scrap piece of wood first with the paint and image you
are using. (Especially if it is a big piece of furniture or unpainted
wood!) If you mess up on a piece of painted wood or metal, you can
always just paint over it and start over!
If you have any other questions or a suggestion, please leave it in the
comments section. I always love to hear how your projects are turning
out!!
Geen opmerkingen:
Een reactie posten