Original by Maud

Materials:
- 1/8 Ply or basswood
Florist wire
waxed thread [or 4 ply knitting cotton or other thread that you are used to]
White acrylic paint
paint brush
wire cutters
super glue
tacky glue
araldite
cardboard
material
narrow ribbon
bunka
narrow braid
net
needle and cotton
wadding
small amount of stuffing
4 stair spindles [5mm dowel could be used
toothpicks
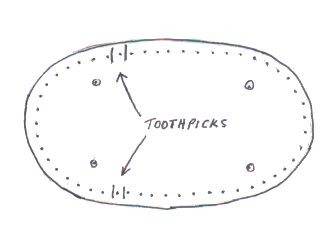
Cut ply to shape as shown. It is best to paint the base before drilling to avoid getting paint in the holes.
Drill 51 holes as shown to suit florist wire. Only drill the holes partway through.
Drill the other holes where shown [for legs] to suit the stair spindles or dowel. If using stair spindles, cut as shown. If using dowels, the length will be 45mm.
Do not glue the legs in position at this stage.
Cut wires and glue in place with super glue. Wires are 1-1/2" long. Bend wires out slightly to form the bassinet shape.
Begin weaving, going in and out as shown for about 6 rows.
Next, place thin toothpicks where shown and as you continue, weave the toothpicks in with the adjoining wire. This will allow the millinery wires that will hold the net, to be placed more easily later.
Continue weaving, until weaving measures 1-1/8" high. Glue the end in place with tacky glue.
Cut the millinery wire, [this has its own covering] 5" long and bend to shape shown.
Carefully remove toothpicks. [only working on one set at a time]. Insert millinery wire. This requires patience and care. If you seem to lose the space for the wire, slip the toothpick back in space to open the weave for the wire and try again. The height of the "arch" should be 2-1/2" from inside the bassinet base.
NOTE: the back wire should be bent back slightly at the level of the top weaving. Approx. ½" from the end of the wire. Tacky glue the wires after they are in place. Where they enter the weaving will be all that's necessary.

Clip the weaving wires close to the "wicker" and dab glue to keep weaving in place. Care should be taken not to cut too close or it might unravel.
Trim the edge with narrow braid or plaited [or croched] wicker thread.
Make the bed using cardboard cut to fit the inside of the bed. Cut the wadding to fit cardboard and glue with tacky glue.
Cut a piece of material to shape and larger so that it can be drawn up to cover the wading and cardboard and finish it off underneath.
A pillow is made approximately 1-1/4' square. Trim with bunka
The bed can have 1" lace slightly gathered and slip stitched around the bed so that it "lines" the inside of the bassinet when the bed is in place.
When all is ready, glue the legs in place with araldite. Do not place bed inside until legs are glued and set.

Cut the net in a large oval app. 7" long and trim with bunka.
Place in position and with a large eyed needle, thread the narrow ribbon through the net and around the wire and back out again.
Tie a bow and repeat for the other side.
Geen opmerkingen:
Een reactie posten