Volgers

Translate

maandag 11 januari 2021

Soeplepel, Lepel, Seef

Soeplepel 
Original by elizabeth

"of all the items on the menu, soup is that which exacts the most delicate perfection and the strictest attention"
(Auguste Escoffier)


Now Ladies and Gentlemen,
Raise your hands if you remember THESE pictures!

 (I do, I do !)
Yes, it is the earrings that I took apart to give the frying pan a handle in the post. 'A Big MAC Attack''.  And do you recall me saying that there was more to come, with the front half that we did not use? 

hmmm?
  Well, run and get that extra piece because I going to show you now how to serve the soup, dipper the water, gather the gravy or scoop up the punch; ( all in miniature, of course.)

So let's begin
This is the earring in its original state.  All in one piece.
And here is another version of a clip earring that shows a slightly different style than the first.
'HELLO?' (this is 'scarry looking', isn't it!?)   Not to worry, it is just a pair of needle nosed pliers  about to  unhinge the front of the earring from the back, just as before.
(very friendly)
Now here is where I left off last time.  
For the frying pan, I used the top piece only; for the ladle I  will now use the LOWER SECTION  You can see it only needs a bit of tweeking to get it from here to there.
So this is where the actual 'work' occurs and it's not that much Using the jewelers needle nosed pliers, you are going to need to straighten out the stem of the ladle and make it as straight and smooth as possible. I do this by dragging the pliers down the stem of the bowl with consistent pressure, as much as possible, trying not to snap the stem off the bowl.

For those using an earring back with an additional circlet for the dangle that would normally be  attached onto it, well it has to go! 
This what I use for that!  These nippers will get right up close and personal with the excess metal.
I purchased mine at Michael's but most jewelry making outlets should carry them, too. These get right along the bottom edge of where you want to make the cut.
Now the circle is gone and the rough spot needs to be sanded smooth with a metal file.  Now you need to slightly bend the bowl of the spoon forward to enable you to dip into the soup.  I actually hold the spoon as if I WAS ladling it up just to get the proper angle of the spoon.  You have to be careful here, because THIS IS THE WEAKEST Part of the SPOON!  The more you bend it the more you weaken it so don't do it hard and don't do it too many times or you will find out the hard way and then there will be NO SOUP FOR YOU! hahah
Yes, hmm, moving right along....
This not the same spoon but is yet another version of a clip earring conversion.  I am showing it to demonstrate the fact that it has a hole in the handle that I have put a jump ring in to enable it to hang.

The spoon had been filed and shaped as earlier mentioned and it ready to now become a useful addition to the mini kitchen!  Now wasn't that easy?  Not even any glue!

These are some of the ones I made earlier and I have enameled them with nail polish in various colors to make them cheerful for those who enjoy vintage!
But this is not the end, oh no, not nearly the end!
READ ON...
 Now we are going to scoop up where we left off and make SIEVES, are you ready?
LET'S BEGIN!
I picked up these jewelry bits from the dollar store for $1.05.  Not bad eh?
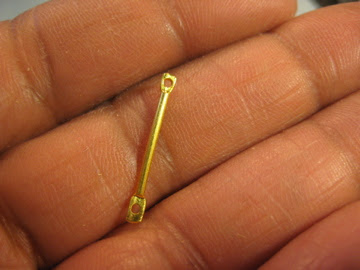
There are 42 pieces in the package and they are 3/4" long with a hole in either end.
This is what they look like out of the package.
So for this you will need to bend only ONE end slightly forward.
Here is the side view of the bent stick
This is an assortment of the variety of pierced earring pans that are usually tied with beads from the 50's and 60's styles.  You can see that there are many sizes and finishes available but they are not all suited for the sieves, just the smallest ones that are no more than 1 and 1/2 cm or 5/8" in diameter.  If you can find them smaller use them, also.
Here is my selection and the jump ring is to be hooked through the straight end and used to hang the utensil on a hook or nail when not in use. (the jump ring that is in my hand is actually too big and I used a smaller one instead)
Hello Quick Grip, old buddy of mine. I ran out of this glue and went to WalMart to buy some more at the same time I bought my groceries, when I unloaded the bags to put the groceries away I forgot about it until later that evening when I needed it, couldn't find it ANYWHERE!!! 2weeks later and I STILL haven't found it, so I have had to buy it yet again! (I think it must have fallen on the floor) hahah
I was trying to move this picture to the end but it just won't stay put so, I am going with the flow.
This is what the final product will look like with the pans glued on and the jump rings thru the handles!  Now, that the picture is taken, I can see the big blob of glue along the handle!  I have picked it off with the tweezers just so ya know.  I  am a bit of a perfectionist in SOME things.  

Now tell me don't they look good?
Come along class, time to get back to work!
(Going backwards now.)  Here again is the handle with the proper sized jump ring through it.
Adding the Quick Grip to the bent end of the handle, THIS, by the way, IS WAY TOO MUCH GLUE!  Just a little goes a long way. But if you do get too much on it is easily removed and you can start again like I had to do, and even once the pan is glued in place, the excess glue can be picked off with a pair of fine tweezers so that the end product is CLEAN.  

The pan is glued onto the handle and needs to dry completely.

Sieve one, and
Sieve Two


Geen opmerkingen:

Een reactie posten